A Complete Guide For Your First TestNG Automation Script
The love of Automation testers, TestNG, is a Java testing framework that can be used to drive Selenium Automation script.
When it comes to automation, no one can compete with Selenium.
If you are planning to dive into the field of automation testing, TestNG can be your topmost choice.
For a beginner, it becomes hard to understand the point from where he needs to start.
So, in this blog, we have come up with a step by step method to assist you in getting started with your first automation test script.
For this, you need to set up an Test Automation environment for selenium with Eclipse first and then go ahead with the script. Let’s do it.
Open your browser in the next tab and get started for your first automation test script in TestNG. All you need is just 20 minutes.
Setting Up The Environment
Step 1: First of all, download java8 or jdk1.8 and install it in your system.
You can use the link to download java8.
http://www.oracle.com/technetwork/java/javase/downloads/jdk8-downloads-2133151.html
After installing java8, set up the path.
o do so, Go to Start→ Computer→ Right click → properties→ Advanced system settings → Environment variable→ New→ After clicking on that you need to enter variable name and variable path.
You’ll see the following screen in the ‘Environment variable’ window.
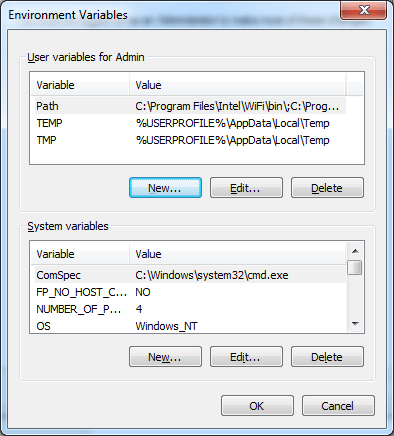
Once you click on New, you’ll see the following window. Enter ‘Path’ as the variable name. And Enter the path where your jdk has been installed in the variable path
Let’s validate if this is properly installed or not.
To do so, open cmd window and type ‘javac’.
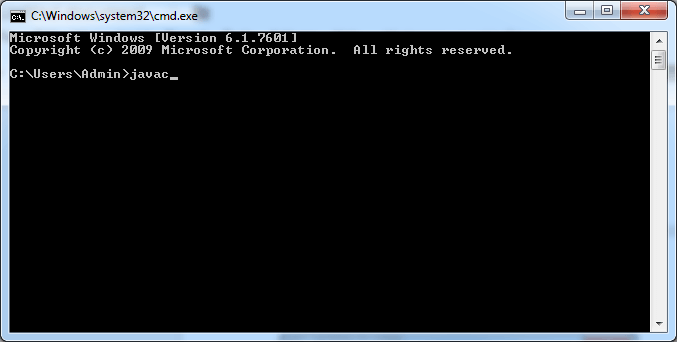
You’ll see a window with all the details of jdk. If you get it, then it is properly installed, if not, then try again.
Step 2: Download Eclipse and Run
You can use this link to download Eclipse.
https://www.eclipse.org/downloads/packages/eclipse-ide-java-developers/keplersr1
Select Eclipse IDE for Java EE Developers and install it.
Once you install it, an eclipse IDE window will open for writing the script and it will look like this.
Step 3: Download TestNG from Eclipse Marketplace
For this, Go to Help→ Eclipse Marketplace
Step 4: Download Selenium 3.11.0
You can use this link to download: https://www.seleniumhq.org/download/
Step 5: Download Selenium dependency files
Download selenium dependency files for jdk 3.11.0 using the link provided here.
Step 6: Create the project
Create a Java project
To create it, go to file→ New→ Other
Select create a Java Project
Enter your project name, I am entering ‘FirstAutomationProject’.
Note: Do not enter spaces in the name of the project
Click Open Perspective
You’ll see that a new Java Project is created at the left side. Now, Click on ‘FirstAutomationProject’. You’ll see src file. Right click on it. Select new→ Other→ Create a new Java Package.
Click Finish.
Step 7: Create a new TestNG class.
Create a new TestNG class under the package newpack. Right click newpack–> New –> Other
Check @BeforeTest and @AfterTest. Once you click on Finish, you’re all set to write your automation script.
A template TestNG code will open up like this.
Step 8: Import Selenium Jar Files in dependency files
Right click on FirstAutomationTest→ Import. Click on’ Add external Jar’ and add the Jar dependency files that you’ve downloaded above.
Writing The Code
On the eclipse window that you’re seeing now, write the following code.
We are writing a code in order to verify the title of webpage.
CODE(self explanatory):
package newpack;
import org.openqa.selenium.WebDriver;
import org.openqa.selenium.chrome.ChromeDriver;
import org.testng.annotations.Test;
//comment the above line and uncomment below line to use Chrome
//import org.openqa.selenium.chrome.ChromeDriver;
public class NewTest {
WebDriver driver;
@Test
public void FirstTest() {
// declaration and instantiation of objects/variables
System.setProperty("webdriver.chrome.driver","C:\\Users\\Admin\\Downloads\\chromedriver_win32\\chromedriver.exe");
driver = new ChromeDriver();
//comment the above 2 lines and uncomment below 2 lines to use Chrome
//System.setProperty("webdriver.chrome.driver","G:\\chromedriver.exe");
//WebDriver driver = new ChromeDriver();
String baseUrl = "https://www.lambdatest.com/";
String expectedTitle = "LambdaTest - Perform all your tests on cloud";
String actualTitle = "";
// launch Chrome and direct it to the Base URL
driver.get(baseUrl);
// get the actual value of the title
actualTitle = driver.getTitle();
/*
* compare the actual title of the page with the expected one and print
* the result as "Passed" or "Failed"
*/
if (actualTitle.contentEquals(expectedTitle)){
System.out.println("Test Passed!");
} else {
System.out.println("Test Failed");
}
//close Fire fox
driver.close();
}
}
